This blog post was originally published at Au-Zone Technologies’ website. It is reprinted here with the permission of Au-Zone Technologies.
In many computer vision applications, detection algorithms are the ‘bread and butter’, whether it be for detecting faces, people, vehicles, or any other objects. If you’re developing a computer vision application, you’re probably familiar with some of the modern detection algorithms such as single shot detector (SSD) or YOLO (You Only Look Once). While these algorithms work quite well for many applications, the state-of-the-art detection models deliver an increase in performance, accuracy, and functionality. As an embedded developer, your primary task for using a detection algorithm should be collecting and labeling the training data for the model (although you might need a good data scientist to assist on this). But you’ll also be tasked for selecting the most appropriate detection algorithm for your application – and it seems like new ones are popping up regularly. This blog will provide you some insight into the pros and cons of three popular algorithms, including SSD, YOLO, and CenterNet.
Detection Begins with a Strong Backbone
Classification models, for example, MobileNet and ResNet, generally contain two parts – a feature extractor (otherwise known as the backbone) and the classification header (or output). A complete classification model needs a classifier header that provides the inference results. However, when combined with a detection model, the classifier header is not used, so the output of the backbone feeds directly into the head of the detection model.
There are many choices when it comes to selecting a backbone for a detection model, although some detection models are designed with specific backbones. For example, YOLO is typically connected to a Darknet backbone. SSD is typically associated with MobileNet. CenterNet has more flexibility and the backbone, such as ResNet, DLA, Hourglass, and others, are selected based on performance and accuracy requirements.
Typically, you can find free backbones and detection models in public model zoos. These come pre-trained with datasets, so you won’t have to train them from scratch. Let Google and others do this heavy lifting on their massive cloud-based machines. However, you’ll also want to do some fine-tuning with data specific for your application. You probably only need to train a few epochs for this fine-tuning of the backbone and detector. NXP eIQ™ ML software development platform is ideal to enable this fine-tuning stage. The eIQ software with the eIQ Toolkit workflow tool enables easy-to-use, end-to-end ML application development, including the ability to import pre-trained models, fine tune them with your application specific data, validate, and profile the results, all with the support of the eIQ Portal’s intuitive GUI. NOTE: You can read more about this in NXP’s blog Machine Learning Goes Mainstream NXPs eIQ ML Software Development Environment Just Got Smarter and Friendlier.
YOLO and SSD Features
At the fundamental level, one primary difference between detection algorithms is how they derive their bounding boxes for locating the regions of interest. Both YOLO and SSD make predictions simultaneously for both localization and classification. The processing starts with feature extraction, then moves on to use predefined anchors to establish the bounding box locations. The algorithms then perform bounding box regressions to establish probabilities based on the user-defined threshold – in other words, for a given bounding box, how confident is the algorithm that it contains an object of interest. And in one of the final steps, the algorithm performs non-max suppression (NMS), which is kind of a low-pass filter that removes the boxes with low probability scores. (NOTE – all anchor box approaches slow down the processing because there are lots of extra steps to process.) Every bounding box is associated with a list of labels, such as person or boat, and their probability scores; these are derived from the classifier. If each bounding box contains an object with an associated list of labels, you can set a threshold value to eliminate bounding boxes that have low probabilities. For an extreme example, the blue bounding box shown in Figure 1 will have all labels (e.g., person, boat), but with very low probability scores.

Figure 1. Demonstrating an extreme example of a bounding box with an object probability of close to zero.
The first version of YOLO was published in 2015 and it represented a big step forward for object detection. Subsequent versions in its evolution have brought numerous features, performance, and size enhancements. I won’t go into further detail here, leaving it up to you to seek out the plethora of papers on these models, but I do want to point out a few things. First, all YOLO versions have Tiny versions which use reduced resolution scales, possibly reducing the accuracy somewhat especially for smaller objects. As the description indicates, tiny versions are smaller and faster to run. Second, and I guess it’s obvious to state – you should always try to use the latest version, assuming that the implementations are stable, and the target device and framework supports all the network’s operators.
Getting to the Point with CenterNet
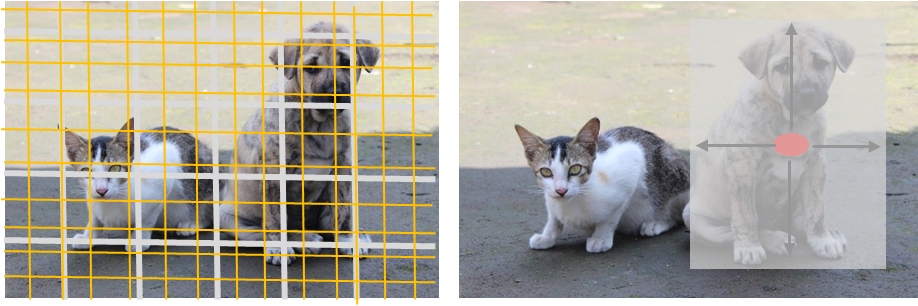
A key selling feature of CenterNet is that it uses a heatmap to find object center points, instead of using anchors and pre-defined boxes. The model still needs a framework to store the heatmap center points (gaussian peaks) but it scales better than anchors because you can set the maximum number of possible objects per image, reducing computation and overlapping (Figure 2).

Figure 2. Comparing YOLO bounding boxes (left) to CenterNet heatmaps (right).
With CenterNet, feature extraction is more straightforward because each heatmap is generated along with the class. In addition, this approach yields reduced training time as well as less post-processing overhead since the NMS is not required. Another benefit of CenterNet is its flexibility to support multi-task detections. With a single pass, this model can do pose estimation (key points), object tracking, instance segmentation, and even 3D detection.
Get Dialed in With Au-Zone’s Optimized CenterNet
It’s possible to use CenterNet directly from a model zoo, if you have the time, patience, and knowledge to adapt the model and retrain for your use cases! Model zoos provide models for basic evaluation and benchmarking, including MobileNets, ResNets, SSD, YOLO, CenterNet, etc. These are reference implementations trained on one of the common public datasets for the purpose of doing apples to apples comparisons (e.g., COCO, OpenImages, VOC). To effectively use these public models in your own application, you’ll have to retrain them using your own dataset and you’ll also need the source code implementation to allow you to make tweaks to retrain it. In other words, directly from the zoo, you won’t be able to train these for your own application without a non-trivial investment of time and effort. Au-Zone has this expertise and will save you time – and lots of it!
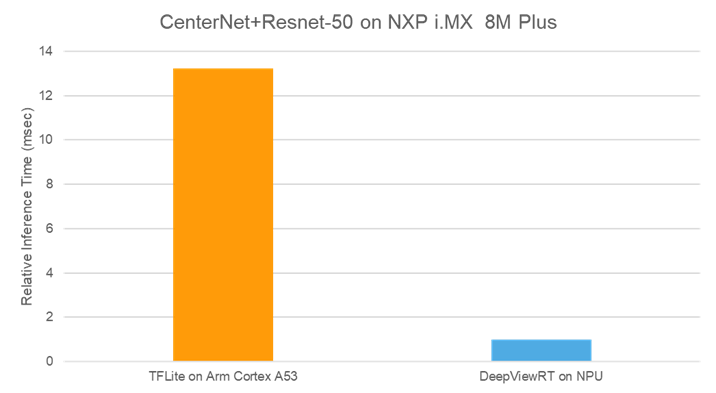
After evaluating the standard, off the shelf implementations of CenterNet on various architectures, we concluded that there were significant performance gains available with a customized implementation of the standard model optimized for deployment on the NPU in NXP’s i.MX 8M Plus application processors. Au-Zone has invested many months of design and development to create a fully optimized, production-ready version that is more performant than the out of the box versions targeting ARM Cortex A (Figure 3) and fully retrainable with your datasets. Au-Zone offers this model as part of its ModelPack – allowing you to focus on your training data and the other parts of your embedded vision application. Au-Zone’s custom implementation deployed to the NPU of the i.MX 8M Plus delivers significantly better performance than the standard, off the shelf model deployed on the quad A53 cores. In practice, this gap is even bigger because typically you wouldn’t dedicate 100% of the A53’s bandwidth to just running the inference.

Figure 3. Standard CenterNet on Quad A53 vs Optimized implementation on NPU
Brad Scott
Co-founder and President, Au-Zone Technologies


