
This article was originally published at NVIDIA’s website. It is reprinted here with the permission of NVIDIA.
With the recent advancements in generative AI and vision foundational models, VLMs present a new wave of visual computing wherein the models are capable of highly sophisticated perception and deep contextual understanding. These intelligent solutions offer a promising means of enhancing semantic comprehension in XR settings. By integrating VLMs, developers can significantly improve how XR applications interpret and interact with user actions, making them more responsive and intuitive.
This post walks you through how to leverage the NVIDIA AI Blueprint for video search and summarization and enhance it to support audio in an XR environment. We explain the step-by-step process—from setting up the environment to seamless integration—for real-time speech recognition and immersive interactions.
Advancing XR applications with multimodal AI agents
Augmenting XR applications with conversational AI functionalities creates a more immersive experience for users. By creating generative AI agents that offer Q&A capabilities within the XR environment, users can interact more naturally and receive immediate assistance. A multimodal AI agent processes and synthesizes multiple input modes—such as visual data (XR headset feeds, for example), speech, text, or sensor streams—to make context-aware decisions and generate natural, interactive responses.
Use cases where this integration can make a substantial impact are:
- Skilled labor training: In industries where simulation training is safer and more practical than using real equipment, XR applications can provide immersive and controlled environments. Enhanced semantic understanding through VLMs enables more realistic and effective training experiences, facilitating better skill transfer and safety protocols.
- Design and prototyping: Engineers and designers can leverage XR environments to visualize and manipulate 3D models. VLMs enable the system to understand gestures and contextual commands, streamlining the design process and fostering innovation.
- Education and learning: XR applications can create immersive educational experiences across various subjects. With semantic understanding, the system can adapt to a learner’s interactions, providing personalized content and interactive elements that deepen understanding.
By integrating VLMs and incorporating features like enhanced semantic understanding and conversational AI capabilities, developers can expand the potential use cases of XR applications.
NVIDIA AI Blueprint for video search and summarization
One of the key challenges in leveraging VLMs for XR applications lies in processing long videos or real-time streams while effectively capturing the temporal context. The NVIDIA AI Blueprint for video search and summarization addresses this challenge by enabling VLMs to handle extended video durations and real-time video feeds.
The AI Blueprint for video search and summarization helps to simplify the development of video analytics AI agents. These agents facilitate comprehensive video analytics by leveraging a VLM and an LLM. The VLM generates detailed captions for the video segments, which are then stored in a vector database. The LLM summarizes these captions to generate a final response to the user’s queries. For more details about this agent and its capabilities, see Build a Video Search and Summarization Agent with NVIDIA AI Blueprint.
The flexible design of this AI Blueprint enables users to tailor the workflow and adapt to different environments. To adapt the blueprint for the specific use case of a virtual reality (VR) agent, the first step is to ensure a continuous stream of VR data into the pipeline. For example, you can use FFmpeg to capture the VR environment directly from the screen of the VR headset. To make the agent interactive, our team prioritized enabling voice communication. What better way to interact with a VR agent than by speaking to it?
There are multiple ways to incorporate audio and visual understanding into XR environments. In this tutorial, we modified the AI blueprint to incorporate audio processing by segmenting both audio and video at consistent intervals, saving them as .mpg and .wav files. The video files (.mpg) are processed by the VLM, while the audio files (.wav) are sent to NVIDIA Riva NIM ASR through an API call for transcription. Riva ASR NIM APIs provide easy access to state-of-the-art automatic speech recognition (ASR) models for multiple languages. The transcribed text is then sent to the VLM along with the corresponding video.
The AI Blueprint for video search and summarization can understand long videos or live streams. However, in the case of this agent, it’s only necessary to understand parts of the video when a user asks a question. The pipeline checks for the presence of an audio transcript. If a transcript is available, the VLM is invoked. If not, the pipeline waits for audio input instead of continuously processing all video frames.
Once a transcript is detected, the pipeline proceeds with both the VLM and large language model (LLM) calls and the generated response is converted back to audio using Riva NIM text-to-speech (TTS) model, which is then spoken back to the user. Figure 1 shows the detailed steps of this process.
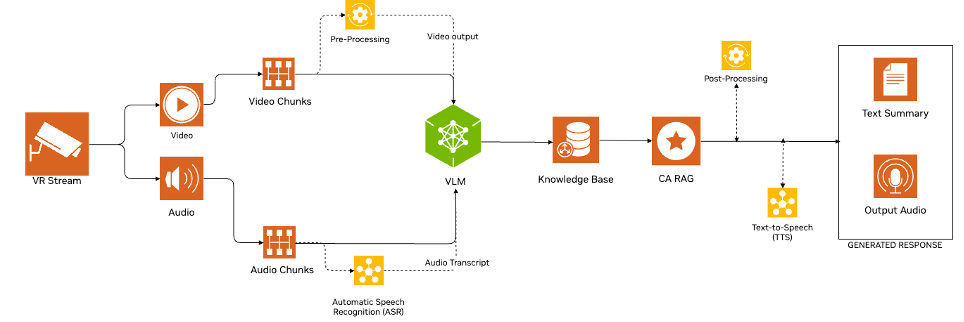 Figure 1. Architecture of the workflow for building a multimodal AI agent with speech AI for XR applications
Step 1: Creating the VR environment
To begin, connect the Meta Quest 3 through the Oculus Link desktop app. Once the headset is connected, then simulate an environment in VR. NVIDIA Omniverse is a platform for developing OpenUSD applications focused on industrial digitalization and physical AI simulation. NVIDIA Isaac Sim serves as a reference application built on Omniverse, intended for the design, simulation, testing, and training of AI-based robots and autonomous machines in a physically accurate virtual environment. This tutorial uses the Cortex UR10 Bin Stacking simulation from the prebuilt Isaac Sim simulations.
With the simulation running, the next task is to connect Isaac Sim to the Quest. This is accomplished by enabling a set of Create XR plugins offered by NVIDIA within Isaac Sim. The activated plugins are as follows:
- Omniverse XR Telemetry
- OpenXR Input/Output
- Playback Extension for XR
- Simulator for XR
- UI Scene View Utilities
- VR Experience
- XR Core Infrastructure
- XR Profile Common
- XR UI Code for Building Profile UIs
- XR UI Code for the Viewport
- XR UI Common
Once these plugins are activated, click the Start VR Mode button using OpenXR to enter the VR environment.
Next, set up the RTSP stream on the Windows system to capture the VR environment by following these steps:
- Download the Windows release for
mediamtx-v1.8.4. - Unzip the downloaded folder and navigate to the directory with
cd mediamtx_v1.8.4_windows_amd64. - Create a
mediamtx.ymlconfig file and place it in the same directory. - Run
.\mediamtx.exeto initiate the RTSP server. - Install FFmpeg on Windows.
- Execute one of the following commands based on your setup. Note that you may need to adjust a few parameters for compatibility and optimal streaming performance.
Run the following command to set up FFmpeg for capturing both the screen and the microphone.
ffmpeg -f gdigrab -framerate 10 -i desktop -f dshow -i audio="Microphone
(Realtek(R) Audio)" -vf scale=640:480 -c:v h264_nvenc -preset fast -b:v 1M
-maxrate 1M -bufsize 2M -rtbufsize 100M -c:a aac -ac 1 -b:a 16k -map 0:v -map
1:a -f rtsp -rtsp_transport tcp rtsp://localhost:8554/stream
Run the following command to set up FFmpeg for screen capture while playing a prerecorded audio file. The command loops the audio indefinitely. To play the audio only once, remove the --stream_loop parameter.
ffmpeg -f gdigrab -framerate 10 -i desktop -stream_loop -1 -i fourth_audio.wav
-vf scale=640:480 -c:v h264_nvenc -qp 0 -c:a aac -b:a 16k -f rtsp
-rtsp_transport tcp rtsp://localhost:8554/stream
Step 2: Adding audio to the pipeline
To support the input and output audio processing, our team modified the AI Blueprint for video search and summarization pipeline such that it can incorporate audio in addition to the video input. This feature will be supported natively by VSS in future releases.
For this tutorial, we modified the ingestion pipeline using the splitmuxsink functionality of GStreamer. The team set up an audio processing pipeline that decodes the incoming audio stream and converts it to a standard format. The splitmuxsink element was then used to write the audio data into segmented .wav files, allowing for easy management and playback. This integration ensures that both audio and video streams are processed concurrently within the ingestion pipeline of the AI blueprint, enabling comprehensive media handling.
The following code shows a sample method to augment the audio workflow:
caps = srcbin_src_pad.query_caps()

if "audio" in caps.to_string():
    decodebin = Gst.ElementFactory.make("decodebin", "decoder")
    audioconvert = Gst.ElementFactory.make("audioconvert", "audioconvert")
    decodebin.connect("pad-added", on_pad_added_audio, audioconvert)

    wavenc = Gst.ElementFactory.make("wavenc", "wav_encoder")
    splitmuxsink = Gst.ElementFactory.make("splitmuxsink", "splitmuxsink")
    splitmuxsink.set_property("location", self._output_file_prefix + "_%05d.wav")
    splitmuxsink.set_property("muxer", wavenc)
    splitmuxsink.set_property("max-size-time", 10000000000)
    splitmuxsink.connect("format-location-full", cb_format_location_audio, self)

    pipeline.add(decodebin)
    pipeline.add(audioconvert)
    pipeline.add(splitmuxsink)

    srcbin.link(decodebin)
    audioconvert.link(splitmuxsink)

    pipeline.set_state(Gst.State.PLAYING)
Step 3: Integration
The blueprint pipeline employs a queue to handle video chunks as they are generated from the live RTSP stream. These video chunks are passed to the VLM alongside a predefined text prompt. Additionally, the same queue is used to process audio chunks, which are sent to the Riva NIM ASR API for transcription. The resulting transcriptions are then used as input text prompts for the VLM.
The AI blueprint ingestion pipeline currently uses the same input prompt across all video chunks, as detailed in Build a Video Search and Summarization Agent with NVIDIA AI Blueprint. The pipeline was modified to use the prompt with questions generated from the transcriptions. This shifts the process from a summarization task to a VQA task for specific video segments when the question is asked. We also made the pipeline more efficient, as it skips the VLM inference for a video chunk if there is no corresponding audio transcription.
The VLM inference output is then appended with information from the Knowledge Base, containing relevant information such as the name of the robotic arm. This is then sent to the LLM to generate the final answer. After the VLM and LLM inference, instead of displaying the generated response on the web UI, the text is sent to the Riva TTS API to create an audio .mp3 file. This file is then sent to the local Windows system, where it is played for the user in the VR setup.
Video 1. Watch a demo of the user interaction with the Cortex UR10 Bin Stacking simulation from Isaac Sim
Get started with the NVIDIA AI Blueprint for video search and summarization
Ready to create your own AI agent using the NVIDIA AI Blueprint for video search and summarization? Apply for the Early Access Program.
Check out these resources to learn more:
- To learn more about VLMs and visual AI agents, register for the on-demand webinar Vision for All: Unlocking Video Analytics With AI Agents.
- Discover other generative AI workflows to enhance your projects using NVIDIA Metropolis NIM workflows.
- Register for NVIDIA GTC 2025 and check out the session AI Agents for Real-Time Video Understanding and Summarization.
Related resources
- GTC session: AI Agents for Real-Time Video Understanding and Summarization
- GTC session: Blueprints for Success: Navigating Multimodal Ingestion for Real-World RAG
- GTC session: Build Visual AI Agents With RAG Using an Agentic AI Toolkit, NVIDIA Riva, and AI Blueprint for Video Search and Summarization
- SDK: NeMo Framework
- Webinar: Enhance Visual Understanding With Generative AI
- Webinar: Vision for All: Unlocking Video Analytics With AI Agents
Shubham Agrawal
AI Developer Technology Engineer, NVIDIA
Nancy Agarwal
Senior Software Engineer, NVIDIA
Lakshmi Ramesh
Systems Software Engineer, NVIDIA